Microsoft Word has powered communication for decades. And while Word handles lengthy documents well, users do not always take advantage of the built-in tools available to them. Features such as tables of contents, the navigation pane, bookmarks and hyperlinks make navigating long Word documents simple.
Styles Take the Pain Out of Navigating Long Word Documents
Savvy Word users use styles to apply font and paragraph formatting to headings. This not only gives documents a consistent look and feel, but it also plays a key role in navigation. Styles make it easy to automatically create tables of contents. They also allow readers to use Word’s navigation pane to quickly move through the document.
To apply a heading style to a paragraph:
- Click anywhere in the heading.
- Then click the Styles tab on the Home ribbon and choose the desired heading.
- Repeat these steps for all headings in the document.
Word offers several built-in styles, including Heading 1, Heading 2 and so forth. Additionally, users can modify the styles or create new ones to apply to the current document or to a template for future use.

Create and Update a Table of Contents
Once you have applied styles to the headings, creating and updating a table of contents takes just seconds. To create an automated table of contents:
- Insert the cursor in the place you want to insert the table of contents.
- On the References tab, click Table of Contents and choose the desired format. Word includes a couple of styles for automatic tables of contents. Or you can customize your table of contents to specify the headings to include and the formatting.
To update the table of contents, simply click anywhere in the table. Then click the Update Table button that appears and select Update Entire Table.
Readers can move directly to a section of the document from the table of contents. At the table of contents, just Ctrl+click the heading for the section to move to.
Use the Navigation Pane to Move Through a Document
In a similar way, Word’s navigation pane allows readers to move directly to specific headings, page numbers or search results. To display the navigation pane, on the View tab, click Show and then select Navigation Pane. The navigation pane displays to the side of the document, with tabs for headings, pages and results.
- Jump to a heading – The Headings tab includes all paragraphs in the document that have a heading style. Click any heading to move directly to that section of the document.
- Jump to a specific page – The Pages tab shows numbered thumbnail images of each page. Click a page to move to it. The thumbnail images allow users to scroll through quickly to find a desired graphic, for instance.
- Search for just about anything – The Search bar allows users to search for specific text, graphics, comments by a certain user, equations and more.
Pro tip: You can also type Ctrl+G anywhere in the document to display the Find and Replace dialog box. This allows you to go to directly to any page, heading, table or other object.
Use Bookmarks to Save a Location for Future Reference
Just like a bookmark in a paper or digital book, bookmarks in Word allow users to mark any item in a document for easy reference.
To add a bookmark:
- Select the text, graphic or other item to refer to.
- On the Insert tab, click Links > Bookmark.
- Enter a descriptive name for the bookmark and click Add.
Note: Bookmark names must begin with a letter. And they can include both letters and numbers, but no spaces.
To jump to a bookmarked location:
- Type Ctrl+G to open the Find and Replace dialog box.
- In the Go to What box, select Bookmark. Then click the bookmark name on the dropdown list.
Add a Hyperlink to a Specific Place in the Document
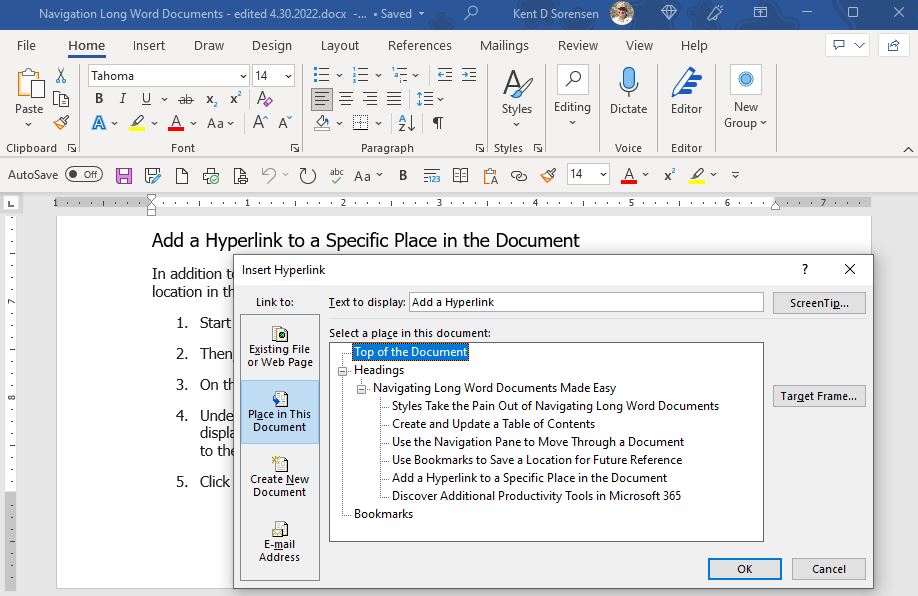
In addition to tables of contents, Word users can add custom hyperlinks to move from one location in the document to another. This helps in navigating long word documents by allowing users to move directly to specific locations, even in the middle of paragraphs.
- Start by marking the destination. That is, give it a heading style or a bookmark.
- Then, select the graphic or text to use as the hyperlink.
- On the Insert menu, click Links > Link.
- Under Link To, click Place in This Document. A list of headings in the current document displays, with bookmarks displayed at the bottom of the list. Note that you can also link to the top of the document.

5. Click the heading or bookmark to link to. Then click OK.
To follow a hyperlink, simply hover the cursor over the hyperlink and Ctrl+Click.
Discover Additional Productivity Tools in Microsoft 365
Microsoft 365 powers business with best-in-class productivity tools. Contact the Microsoft experts at Messaging Architects to learn more about Microsoft 365 productivity tips and explore your options for migrating to Microsoft 365.


